
How to make your own LPG gas sensor easily with Arduino

Touching innovation niche, we are today going to explain you assembly of components to make a fully functional gas sensor module for sensing LPG leakage at homes and organizations.
Let us first focus on the components needed for it; following components are easily available on www.forstudents.in in full kit.
- 5v DC power Supply
- A MQ 6 Gas Sensors
- A Arduino Board
- Few Jumper wires
- A Bread Board
- A LED
- A Resistor close to 100 Ω
- A Resistor close to 20 K
- And a gas lighter/ Buzzer to test the module
Step1 – Solder or paste jumper wires to each pin of your gas sensor.
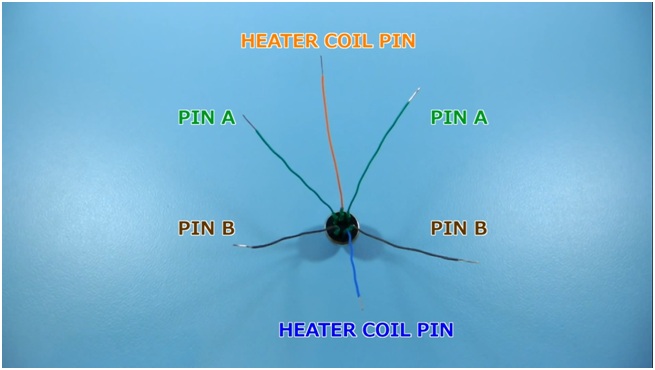
Step2 – Take your bread board and put one of the heater coil pin to positive rail of it. Similarly other heater coil pin goes to negative rail of your bread board. In the same way connect both A wires to positive rail, and B wires to same rail as shown in diagram below.
Step3 – Connect a resistor near 20k (we used 22k) to GND and same rail where B wires are.

Step4 – Now connect a jumper wires between B pin (bread board) and A0 pin in your Arduino Board.
Step5 – Connect your bread board GND rail with Arduino Ground Pin
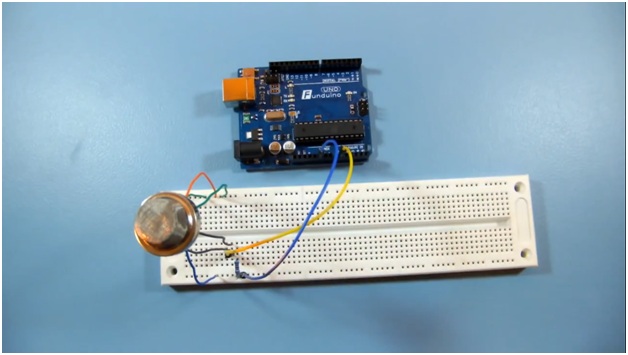
Step6 – Now connect negative pin of your Buzzer/LED to GND rail of bread board, and positive pin to any of empty positive rail of your bread board.
Step7 – Connect a resister close to 100Ω (we used 120Ω) to positive pin of your LED/Buzzer, and the negative to Arduino Pin no. 8 using a jumper wire.

Step8 – Now connect a 5V DC power supply to +ve and –ve rail of your bread board. If using power supply more than 5V then you can easily maintain the voltage by using 5V voltage regulator.

Step9 – Download Arduino IDE software. Now connect Arduino Board to your computer using USB.
Step10 – Open Arduino IDE, and open your gas sensor code in it. The code can be found at “Sir Plz provide the link location Where ever you have the zip file”
Step11 – Goto file option in Arduino IDE there click on Upload option, wait for some time till code get uploaded in your Arduino microcontroller.
Step12 – Go to tools>>serial monitor. You should see the value between 0 and 1000 in new window. Wait for values to get constant at some level below 100, usually take 3-4 minutes for the first time connection.
Step13 – There you go, Use the fortunate gas lighter to provide gas to your newly developed Gas sensor. You will see value increases automatically and when it reaches 500 the LED/Buzzer get activated.

*You can adjust the sensitivity in the code easily by changing the value from 500 to other one.
Have questions?? Feel free to write in comments.
The Author- Akhilesh Sharma is Technical Innovation Head at Graphic Era University, Dehradun-Uttarakhand India. After been indulge in several Tech innovation seminars now he is up for writing with “nextrollout.com”.